Compare commits
38 Commits
| Author | SHA1 | Date | |
|---|---|---|---|
|
|
3d73cd9a73 | ||
|
|
263b6310e5 | ||
|
|
74d068c2ac | ||
|
|
91c5ddd393 | ||
|
|
503638e944 | ||
|
|
09259b4776 | ||
|
|
2d94c12e06 | ||
|
|
dca2c0699c | ||
|
|
bee831bff1 | ||
|
|
f5df7526f9 | ||
|
|
42ac68310e | ||
|
|
626595638e | ||
|
|
c21ba018cf | ||
|
|
6fcc9ecbaa | ||
|
|
1ed399566b | ||
|
|
467d99ace4 | ||
|
|
688d464381 | ||
|
|
95a6d99acd | ||
|
|
7884a13693 | ||
|
|
f5a23433ca | ||
|
|
10715d67d1 | ||
|
|
8476aaee97 | ||
|
|
11df7c6e04 | ||
|
|
b8367fc835 | ||
|
|
736316ea87 | ||
|
|
82d0454992 | ||
|
|
475a1fb3ec | ||
|
|
9c91f7f320 | ||
|
|
d5823fe75a | ||
|
|
bd73e8b1d5 | ||
|
|
d2d59188ba | ||
|
|
6d1a276d10 | ||
|
|
c326b8c747 | ||
|
|
8b301a4534 | ||
|
|
3682583200 | ||
|
|
eee1344804 | ||
|
|
840dd95258 | ||
|
|
c6dce428e4 |
@@ -51,17 +51,6 @@ jobs:
|
|||||||
- name: echo-step
|
- name: echo-step
|
||||||
run: echo "${{ github.event.release.target_commitish }}"
|
run: echo "${{ github.event.release.target_commitish }}"
|
||||||
|
|
||||||
- name: uploading archive to prod
|
|
||||||
if: ${{ steps.branch_name.outputs.branch == 'main' || github.event.release.target_commitish == 'main'}}
|
|
||||||
uses: wlixcc/SFTP-Deploy-Action@v1.0
|
|
||||||
with:
|
|
||||||
username: ${{ secrets.USERNAME }}
|
|
||||||
server: ${{ secrets.SERVER }}
|
|
||||||
ssh_private_key: ${{ secrets.SSH_PRIVATE_KEY }}
|
|
||||||
local_path: ${{ github.event.repository.name }}_${{ steps.tag_name.outputs.tag }}.zip
|
|
||||||
remote_path: '${{ secrets.STG_UPLOAD_URL }}'
|
|
||||||
args: '-o ConnectTimeout=5'
|
|
||||||
|
|
||||||
- name: uploading archive to staging
|
- name: uploading archive to staging
|
||||||
if: ${{ steps.branch_name.outputs.branch == 'develop' || github.event.release.target_commitish == 'develop' }}
|
if: ${{ steps.branch_name.outputs.branch == 'develop' || github.event.release.target_commitish == 'develop' }}
|
||||||
uses: wlixcc/SFTP-Deploy-Action@v1.0
|
uses: wlixcc/SFTP-Deploy-Action@v1.0
|
||||||
@@ -72,4 +61,3 @@ jobs:
|
|||||||
local_path: ${{ github.event.repository.name }}_${{ steps.tag_name.outputs.tag }}.zip
|
local_path: ${{ github.event.repository.name }}_${{ steps.tag_name.outputs.tag }}.zip
|
||||||
remote_path: '${{ secrets.STG_UPLOAD_URL }}'
|
remote_path: '${{ secrets.STG_UPLOAD_URL }}'
|
||||||
args: '-o ConnectTimeout=5'
|
args: '-o ConnectTimeout=5'
|
||||||
|
|
||||||
|
|||||||
+1
-1
@@ -1,3 +1,3 @@
|
|||||||
booktitle=Zerto In-Cloud (ZIC) for Amazon Web Services (AWS) v1.1 - Installation, Configuration and Operation Guide
|
booktitle=ZIC for AWS Installation Guide - GitHub version
|
||||||
spreadsheet.xml=classification.xml
|
spreadsheet.xml=classification.xml
|
||||||
manual.name=ZIC_1.1.HTML
|
manual.name=ZIC_1.1.HTML
|
||||||
@@ -9,7 +9,7 @@ Use these steps to configure a Zerto In-Cloud IAM Policy and assign roles for ZI
|
|||||||
|
|
||||||
#### Create a Policy
|
#### Create a Policy
|
||||||
|
|
||||||
1. Navigate to the JSON tab, copy and paste the following:
|
- Navigate to the JSON tab, copy and paste the following:
|
||||||
```{
|
```{
|
||||||
"Version": "2012-10-17",
|
"Version": "2012-10-17",
|
||||||
"Statement": [
|
"Statement": [
|
||||||
@@ -75,19 +75,20 @@ Use these steps to configure a Zerto In-Cloud IAM Policy and assign roles for ZI
|
|||||||
]
|
]
|
||||||
}
|
}
|
||||||
```
|
```
|
||||||
2. Name the policy **ZicScaleAccountPolicy** and **Save**.
|
- Name the policy **ZicScaleAccountPolicy** and **Save**.
|
||||||
|
|
||||||
#### Create Roles
|
#### Create Roles
|
||||||
|
|
||||||
1. Go to **Roles**.
|
1. Go to **Roles**.
|
||||||
2. Create role - **Another AWS account**.
|
2. Create role - **Another AWS account**.
|
||||||
3. In **Account ID** insert the Deployment account. Click **Next**.
|
3. In **Account ID** insert the Deployment account. Click **Next**.
|
||||||
|
|
||||||

|

|
||||||
|
|
||||||
4. Select the policy you created. Click **Next**.
|
- Select the policy you created. Click **Next**.
|
||||||
|
|
||||||

|

|
||||||
|
|
||||||
5. Name the Role **ZicScaleAccountRole**.
|
- Name the Role **ZicScaleAccountRole**.
|
||||||
|
|
||||||

|

|
||||||
|
|||||||
@@ -1,6 +1,16 @@
|
|||||||
# Deploying the ZIC Instance
|
#### Obtain the Image Pull Image
|
||||||
|
|
||||||
First you must obtain the image pull key secret. After you receive the email notification that your AWS Account ID was added to the privately published AMI, continue with the following configuration, deployment and installation steps.
|
The image pull key secret is used in the deployment to enable downloading Zerto’s component images. Follow these steps to obtain the image pull key secret.
|
||||||
|
|
||||||
|
1. Log in to myZerto.
|
||||||
|
2. Navigate to **Support & Downloads > Software Downloads > Zerto In-Cloud**.
|
||||||
|
3. Click **Download Online Installer** to download the installer.
|
||||||
|
4. Click **Download Primary Account IAM Policy** to download the policy files.
|
||||||
|
5. Click **Download Collection** to download collection for Postman.
|
||||||
|
6. Click **Username and Password** and generate keys.
|
||||||
|
7. Copy the Username and Password keys to a local file so you have access to them when you need this information later when installing Zerto software.
|
||||||
|
|
||||||
|
The account team will send an email notification that your AWS Account ID was added to the privately published AMI. After you receive the email notification continue with the following configuration, deployment and installation steps.
|
||||||
|
|
||||||
#### AWS Configuration
|
#### AWS Configuration
|
||||||
|
|
||||||
@@ -48,14 +58,4 @@ First you must obtain the image pull key secret. After you receive the email not
|
|||||||
```
|
```
|
||||||
|

|
||||||
|
|
||||||
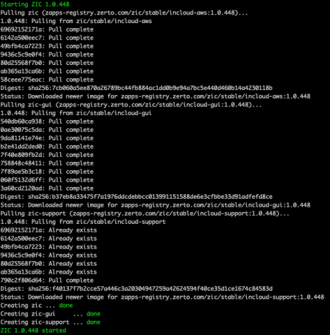
When the installation completes, it will display “Starting ZIC 1.0.x” and continue displaying status until it displays “ZIC 1.0.x started”. You can now connect to ZIC.
|
When the installation completes, it will display “Starting ZIC 1.0.x” and continues displaying the status until it displays “ZIC 1.0.x started”. You can now connect to ZIC.
|
||||||
|
|
||||||
#### Connecting to ZIC
|
|
||||||
|
|
||||||
1. Connect to ZIC using the URL [https://zic-ip-address](https://zic-ip-address) to validate it is online.
|
|
||||||
2. The installer will prompt you for a username and password. Log in with the username and password generated in the ZIC download page in myZerto.
|
|
||||||
3. The online installer will pull the latest code from myZerto and perform the installation.
|
|
||||||
|
|
||||||
4. Log in using the default "admin" for both user and password for the first time.
|
|
||||||
3. At the prompt change the admin password.
|
|
||||||
|
|
||||||
|
|||||||
@@ -1,7 +1,3 @@
|
|||||||
## ZIC Installation
|
|
||||||
|
|
||||||
The installation installs the following components:
|
|
||||||
|
|
||||||
- **Zerto In-Cloud Manager** </br>
|
- **Zerto In-Cloud Manager** </br>
|
||||||
A containerized application that manages everything required for the orchestration and replication between the protected and recovery availability zones, regions, and accounts in AWS. ZIC leverages native AWS platform snapshots and manages the SLA using the Zerto journal and familiar Zerto protection components and methods.
|
||||||
|
|
||||||
|
|||||||
Reference in New Issue
Block a user